Tutorial: Using ECR for Private Images
Objective
The purpose of this tutorial is to walk you through how to configure Replicated KOTS to pull images from a private registry in Amazon's Elastic Container Registry (ECR). This tutorial demonstrates the differences between using public and private images with KOTS.
Prerequisites
-
To install the application in this tutorial, you must have a virtual machine (VM) that meets the following minimum requirements:
- Ubuntu 18.04
- At least 8 GB of RAM
- 4 CPU cores
- At least 40GB of disk space
-
To pull a public NGINX container and push it to a private repository in ECR as part of this tutorial, you must have the following:
- An ECR Repository
- An AWS account to use with Docker to pull and push the public NGINX image to the ECR repository. The AWS account must be able to create a read-only user.
- Docker
- The AWS CLI
Overview
The guide is divided into the following steps:
1. Set Up the Testing Environment
We are going to use the default NGINX deployment to create our application and then update it to pull the same container from a private repository in ECR and note the differences.
Create Sample Application and deploy the first release
In this section, we cover at a high level the steps to create a new application and install it on a VM.
For more detailed information about how to create and install an application, follow one of the following getting started tutorials:
To create our sample application follow these steps:
- Create a new application in the Replicated vendor portal and call it 'MySampleECRApp'.
- Create the first release using the default definition files and promote it to the unstable channel.
- Create a customer, assign it to the Unstable channel and download the license file after creating the customer.
- Install the application to a VM
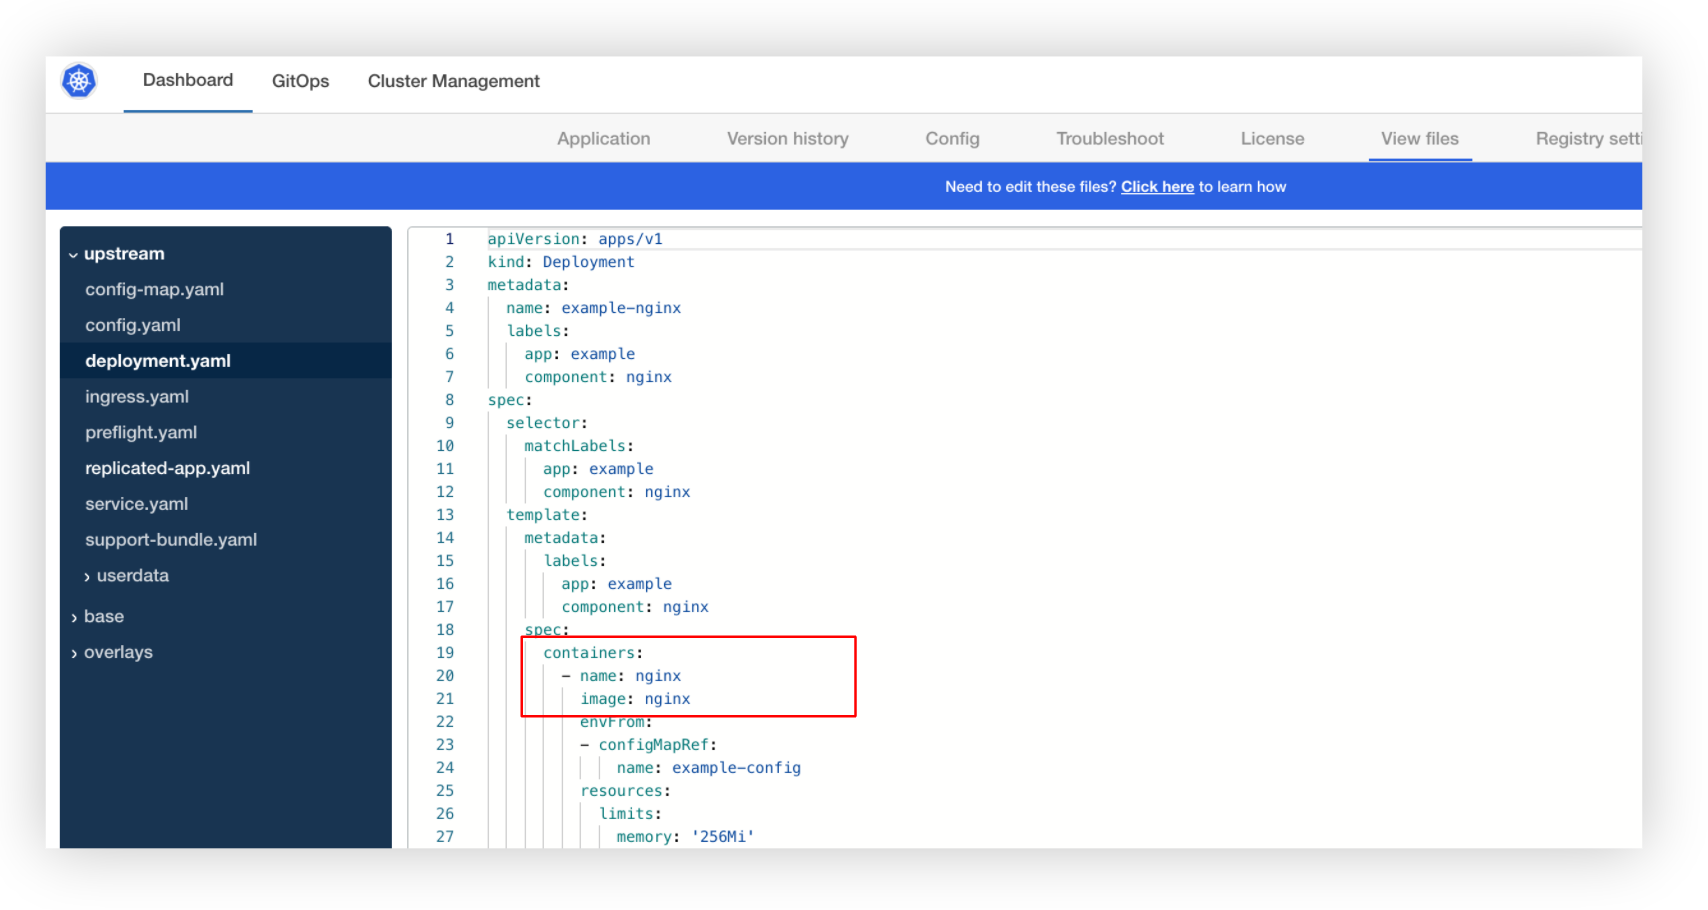
Log in to the Replicated admin console. To inspect what was deployed, look at the files under View Files from the admin console. In the Upstream files (files from the release created in the vendor portal) show that we are pulling the public image.
We can further validate this if we switch back to the terminal window on the VM where we installed the application.
If we run kubectl describe pod <pod-name> on the NGINX pod, we can confirm that it was in fact pulled from the public repository.
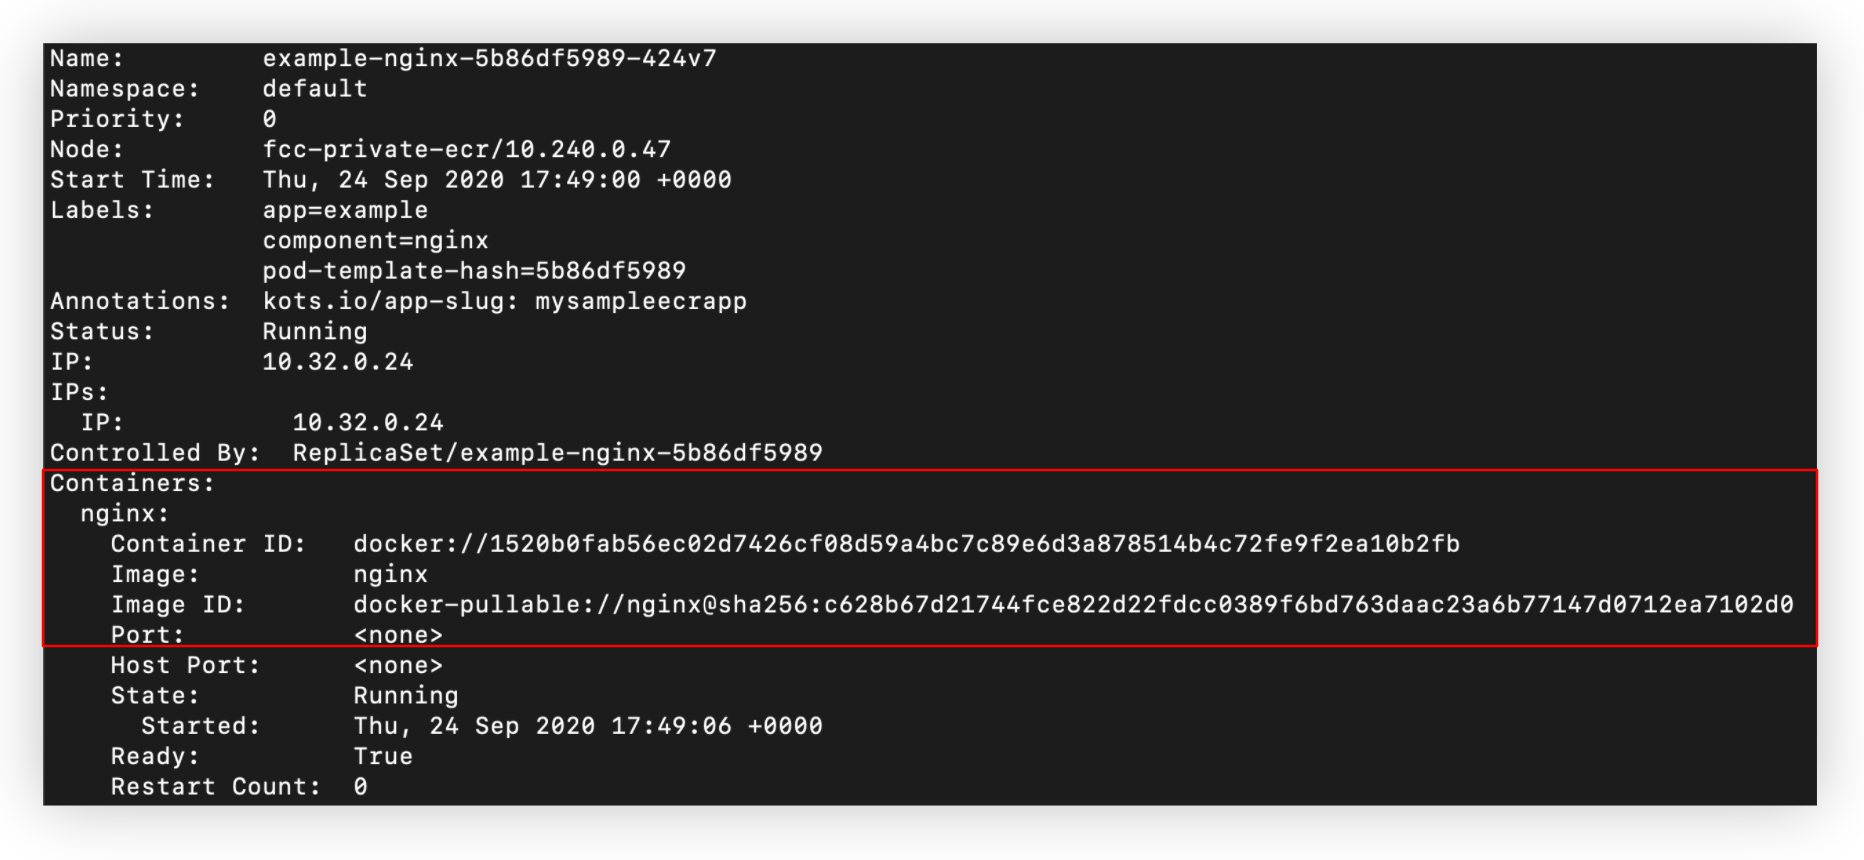
Now that we have the basic application installed, we are now going to pull the same image, but from an ECR repository.
Pull Public Image and Push to ECR
To keep the changes to a minimum and only focus on using a private registry, we are going to pull the public NGINX container (as specified in the deployment.yaml file) to our local environment, and then push it to a repository in ECR.
To use docker login with ECR, we will need to configure AWS CLI with the AWS Access Key ID and AWS Secret Key for this user.
Let's start by pulling the public image:
$ docker pull nginx
You should have an output similar to this:
Using default tag: latest
latest: Pulling from library/nginx
d121f8d1c412: Pull complete
ebd81fc8c071: Pull complete
655316c160af: Pull complete
d15953c0e0f8: Pull complete
2ee525c5c3cc: Pull complete
Digest: sha256:c628b67d21744fce822d22fdcc0389f6bd763daac23a6b77147d0712ea7102d0
Status: Downloaded newer image for nginx:latest
docker.io/library/nginx:latest
Next, log in to ECR and push this container.
To use docker login with ECR, install the AWS CLI and configure it if not already done.
As part of this, we will need to provide the AWS Access Key ID and AWS Secret Key for a user that has permissions to create and push images to the repository. For more information about working with containers and ECR in the AWS CLI, see Using Amazon ECR with the AWS CLI.
Just like with any other private registry, we need to know the registry endpoint to pass the docker login command.
The syntax is as follows:
docker login [some.private.registry]:[port]
In this case, the endpoint is the [some.private.registry]:[port]
To determine the endpoint for ECR, log in to the AWS console and search for 'ECR', which should bring up Elastic Container Registry as an option as shown below.
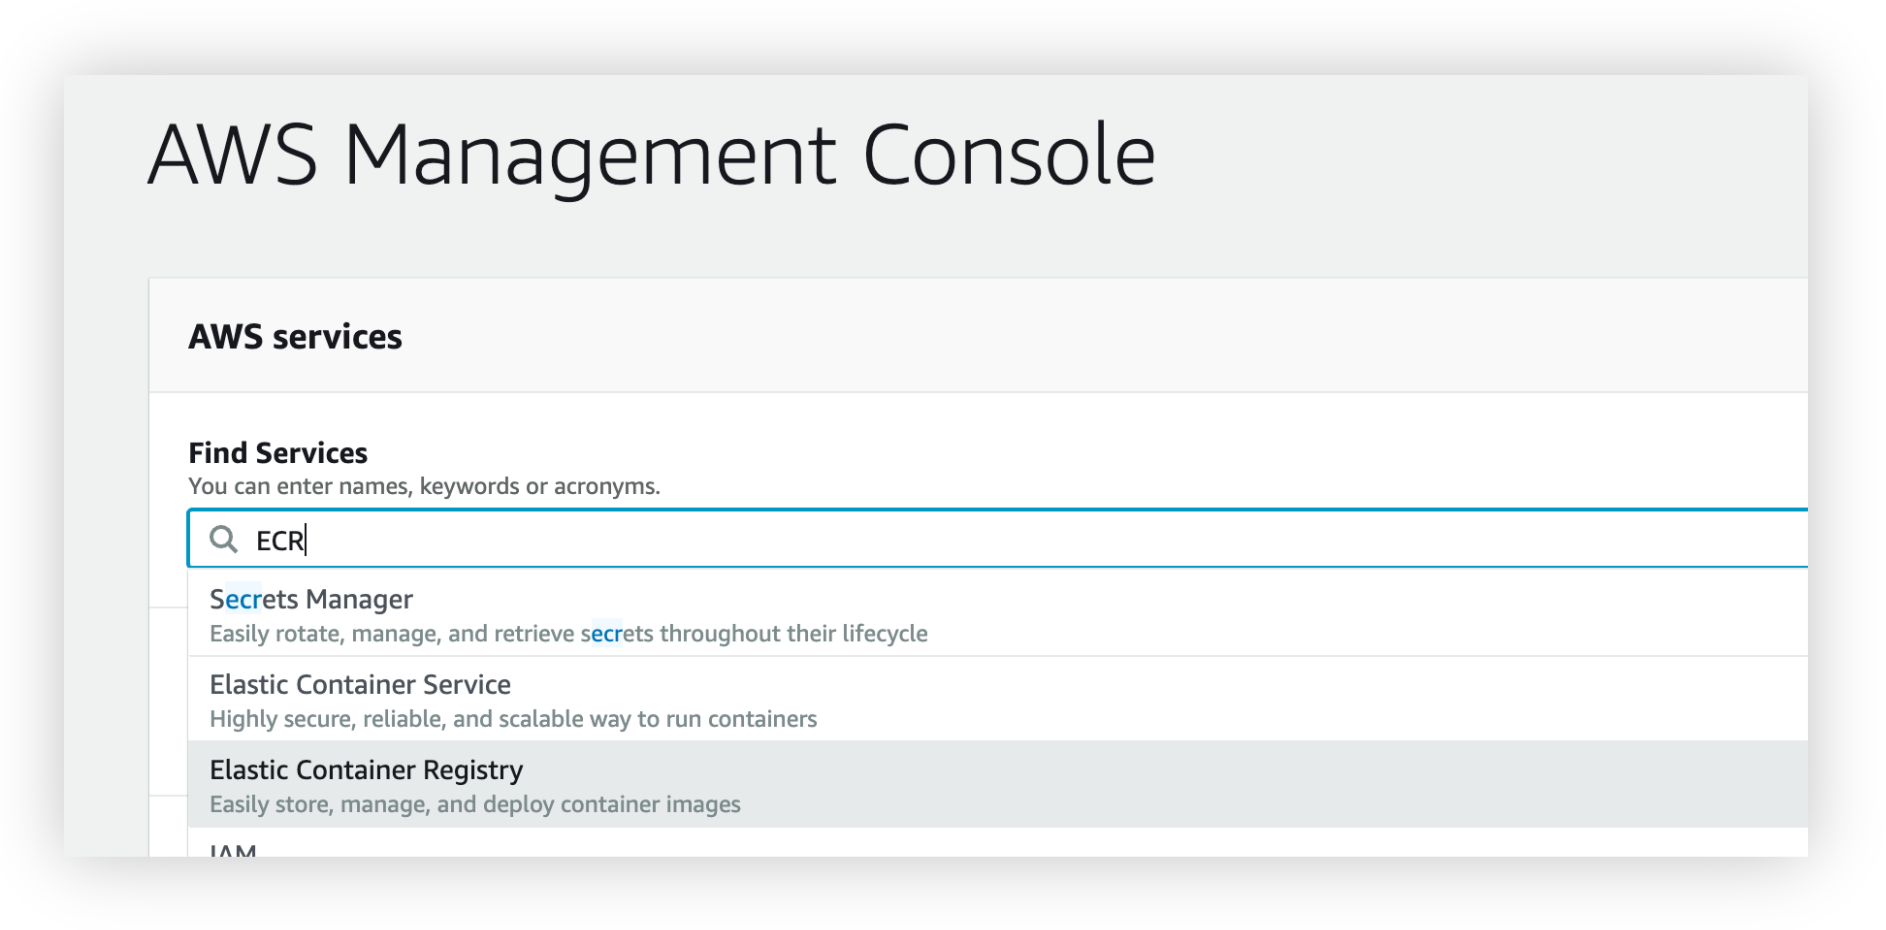
Select 'Elastic Container Registry' from the options in the dropdown to get to the list of repositories.

As you can see from the screenshot above, you can see the endpoints for each repository under the URI column. For the purpose of this guide, we will push the NGINX image to the demo-apps repository.
To determine the endpoint to use in the login command, use the URL without the repository name.
When logging in to ECR, use the AWS CLI to the user credentials. For example, to log in to ECR, we run the following command:
$ aws ecr get-login-password --region us-east-2 | docker login --username AWS --password-stdin 4999999999999.dkr.ecr.us-east-2.amazonaws.com
A successful login will display a Login Succeeded message.
To push this image to our private repository, tag the image.
The new tag will consist of:
<ecr repoendpoint>/image
For example, to tag the public NGINX image, we run the following command:
$ docker tag nginx 4999999999999.dkr.ecr.us-east-2.amazonaws.com/demo-apps/nginx
Assuming the tagging is successful, push the container to our ECR repository:
$ docker push 4999999999999.dkr.ecr.us-east-2.amazonaws.com/demo-apps/nginx
The push refers to repository [4999999999999.dkr.ecr.us-east-2.amazonaws.com/demo-apps/nginx]
908cf8238301: Pushed
eabfa4cd2d12: Pushed
60c688e8765e: Pushed
f431d0917d41: Pushed
07cab4339852: Pushed
latest: digest: sha256:794275d96b4ab96eeb954728a7bf11156570e8372ecd5ed0cbc7280313a27d19 size: 1362
Our testing environment is all set. We are now ready to update Replicated to use the private registry.
2. Configure Private Registries in Replicated
To configure a Private Registry in Replicated, we need to provide the same information we needed to login to ECR in the previous step:
- Endpoint
- Username
- Password
The difference is that we'll use a different user than the one we used previously. Since Replicated only needs to pull images, it is a best practice to create a 'read-only' user for this specific purpose.
Determine the endpoint
The endpoint should be the same as the one we provided in the previous step.
Setting up the Service Account User
Replicated only needs access to pull images from the private registry. Let's create a new user in AWS:
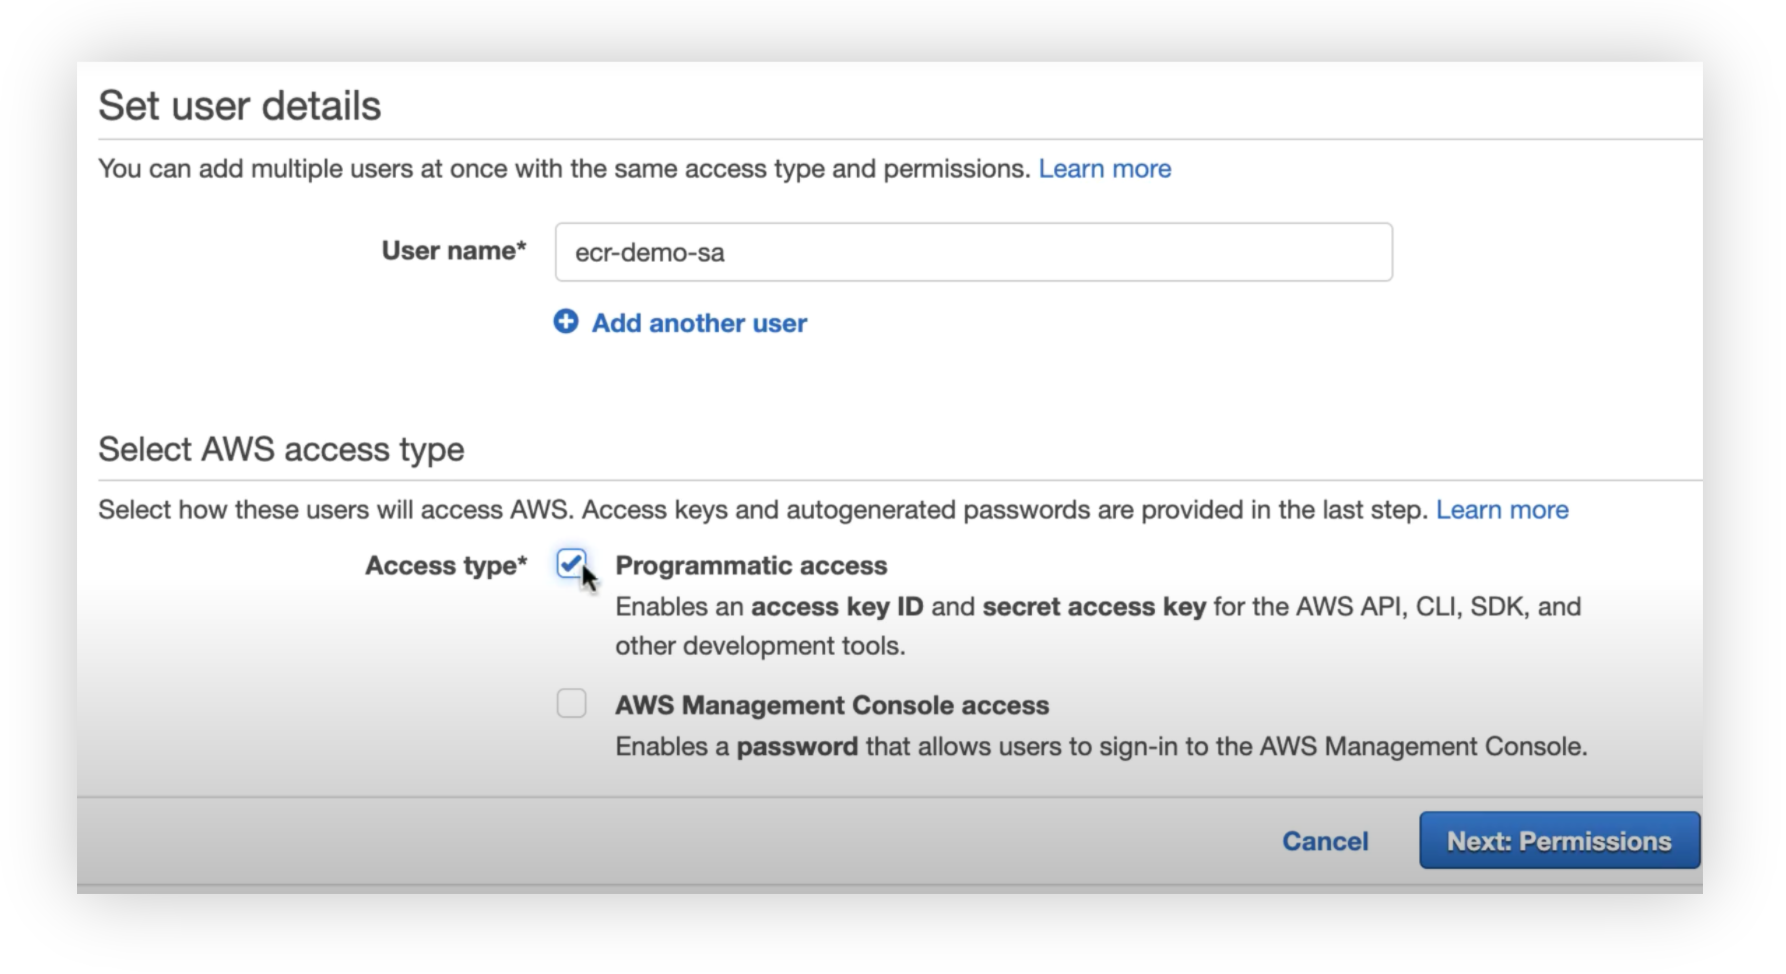
As far as permissions go, there are a couple of options, depending on scope of access. If exposing all images to Replicated is an acceptable solution, the Amazon-provided AmazonEC2ContainerRegistryReadOnly policy will work:
{
	"Version": "2012-10-17",
	"Statement": [{
		"Effect": "Allow",
		"Action": [
			"ecr:GetAuthorizationToken",
			"ecr:BatchCheckLayerAvailability",
			"ecr:GetDownloadUrlForLayer",
			"ecr:GetRepositoryPolicy",
			"ecr:DescribeRepositories",
			"ecr:ListImages",
			"ecr:DescribeImages",
			"ecr:BatchGetImage"
		],
		"Resource": "*"
	}]
}
If you wish to limit Replicated to only certain images, this policy should be used instead:
{
    "Version": "2012-10-17",
    "Statement": [{
        "Effect": "Allow",
        "Action": [
		    "ecr:BatchCheckLayerAvailability",
		    "ecr:GetDownloadUrlForLayer",
		    "ecr:GetRepositoryPolicy",
		    "ecr:DescribeRepositories",
		    "ecr:ListImages",
		    "ecr:DescribeImages",
		    "ecr:BatchGetImage"
        ],
        "Resource": [
            "arn:aws:ecr:us-east-1:<account-id>:repository/<repo1>",
            "arn:aws:ecr:us-east-1:<account-id>:repository/<repo2>"
        ]
    }]
}{
    "Version": "2012-10-17",
    "Statement": [
        {
            "Effect": "Allow",
            "Action": [
                "ecr:GetAuthorizationToken"
            ],
            "Resource": "*"
        },
    ]
}
We will need the AWS Access Key ID and AWS Secret Key in the next section as these will map to the Username and Password fields. You can obtain these as you create the user or after the user has been created.
Enter Registry Information in Replicated
First, we must link Replicated with the registry. To do this, click on Add External Registry from the Images tab.
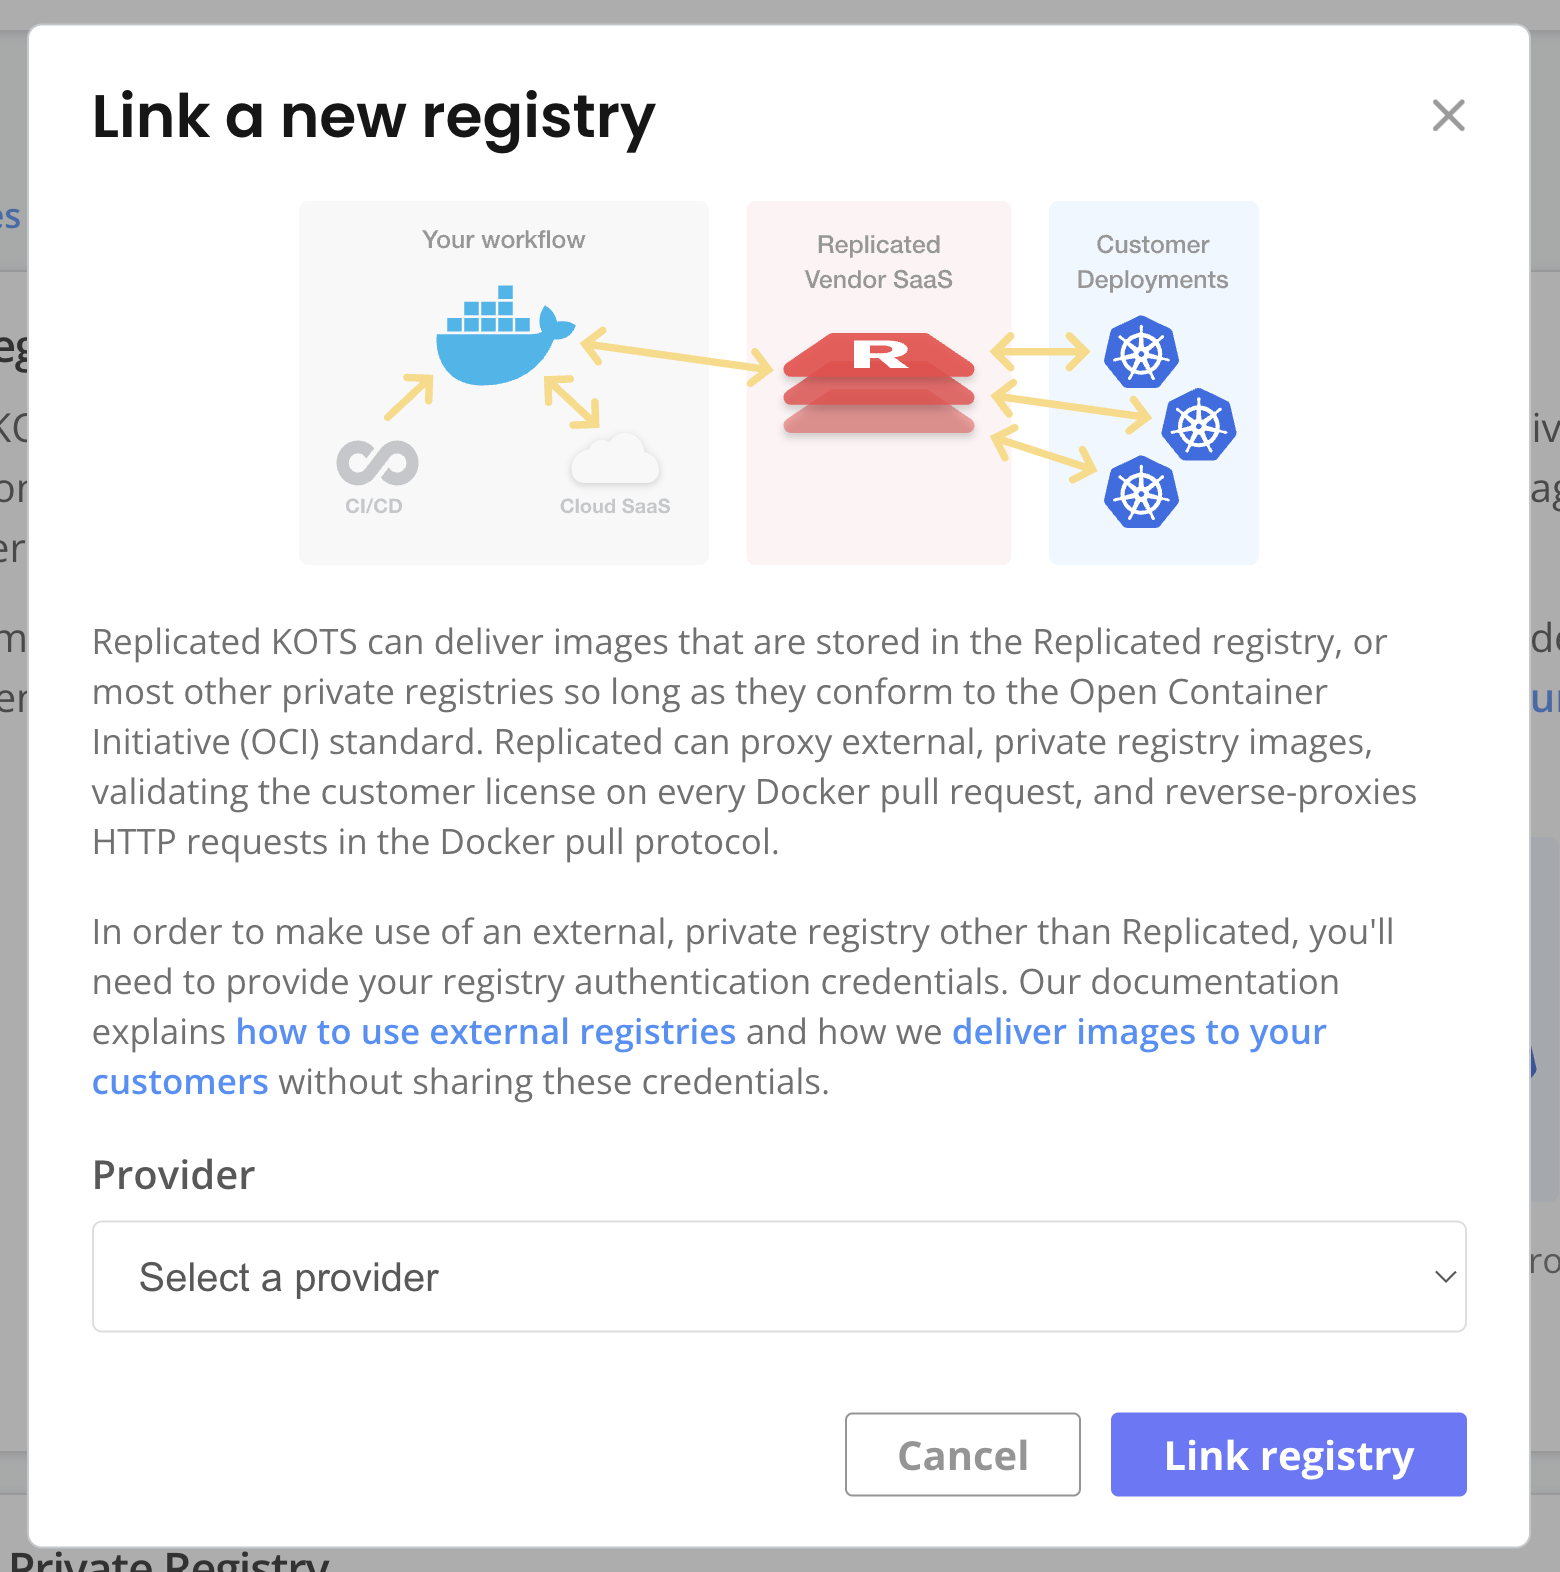
View a larger version of this image
The values for the fields are:
Endpoint: Enter the same URL used to log in to ECR. For example, to link to the same registry as the one in the section, we would enter 4999999999999.dkr.ecr.us-east-2.amazonaws.com.
Username: Enter the AWS Access Key ID for the user created in the Setting Up the Service Account User section.
Password: Enter the AWS Secret Key for the user created in the Setting Up the Service Account User section.
3. Update Definition Files
Last step is to update our definition manifest to pull the image from the ECR repository.
To do this, we'll update the deployment.yaml file by adding the ECR registry URL to the image value.
Below is an example using the registry URL used in this guide.
	    spec:
	      containers:
	        - name: nginx
-	          image: nginx
+			  image: 4999999999999.dkr.ecr.us-east-2.amazonaws.com/demo-apps/nginx
	          envFrom:
Save your changes and create the new release and promote it to the Unstable channel.
4. Install the New Version
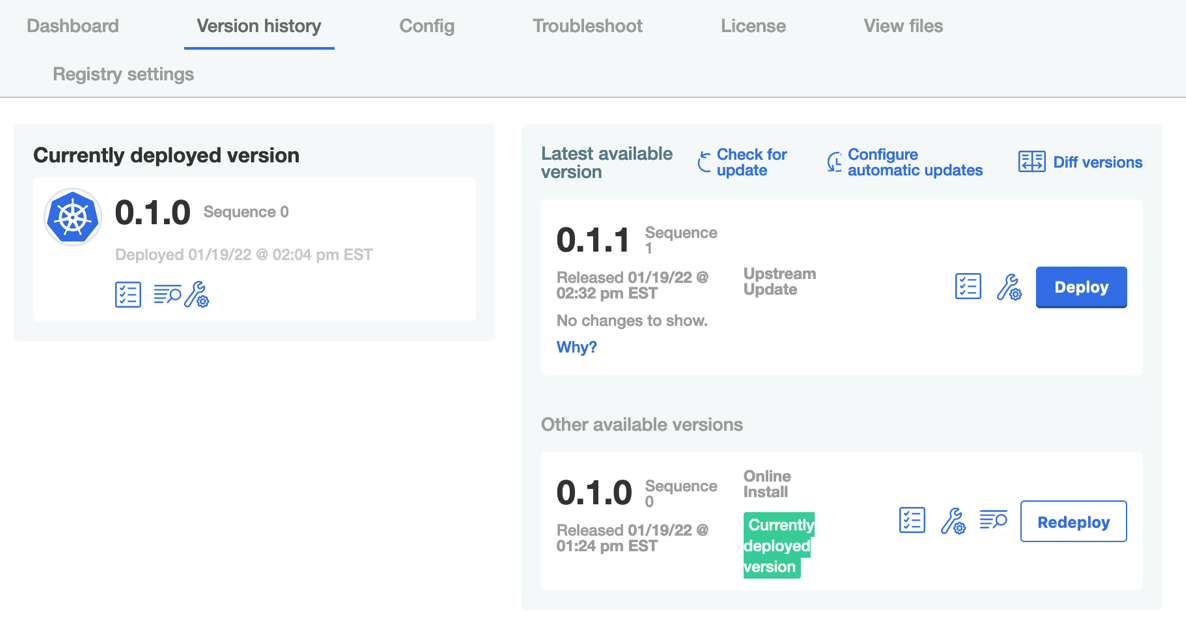
To deploy the new version of the application, go back to the admin console and select the Version History tab. Click on Check for Updates and then Deploy when the new version is listed. To confirm that the new version was in fact installed, it should look like the screenshot below.
Now, we can inspect to see the changes in the definition files.
Looking at the deployment.yaml upstream file, we see the image path as we set it in the Update Definition Files section.

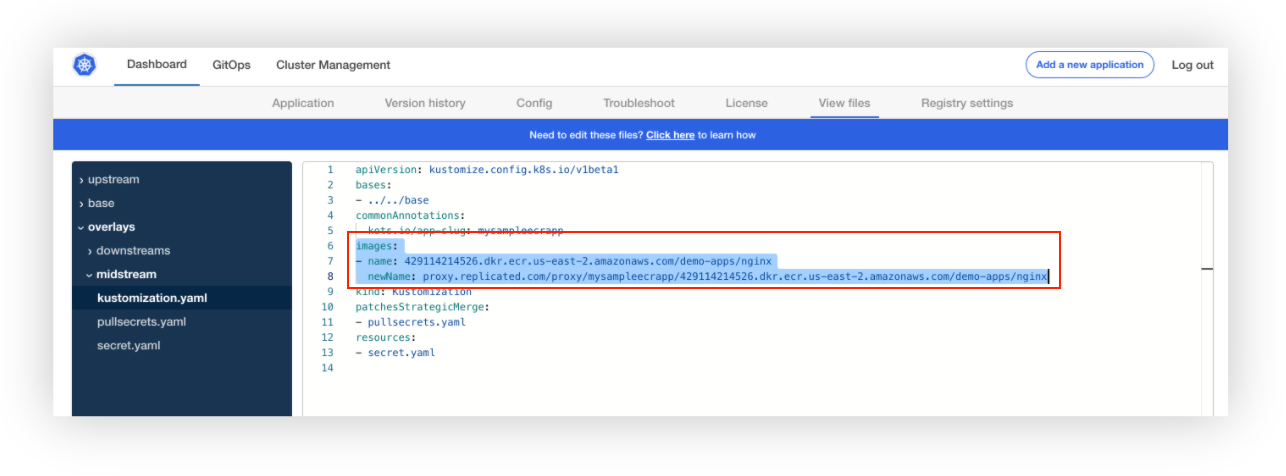
Because KOTS is able to detect that it cannot pull this image anonymously, it then tries to proxy the private registries configured. Looking at the kustomization.yaml downstream file we can see that the image path is changed to use the Replicated proxy.
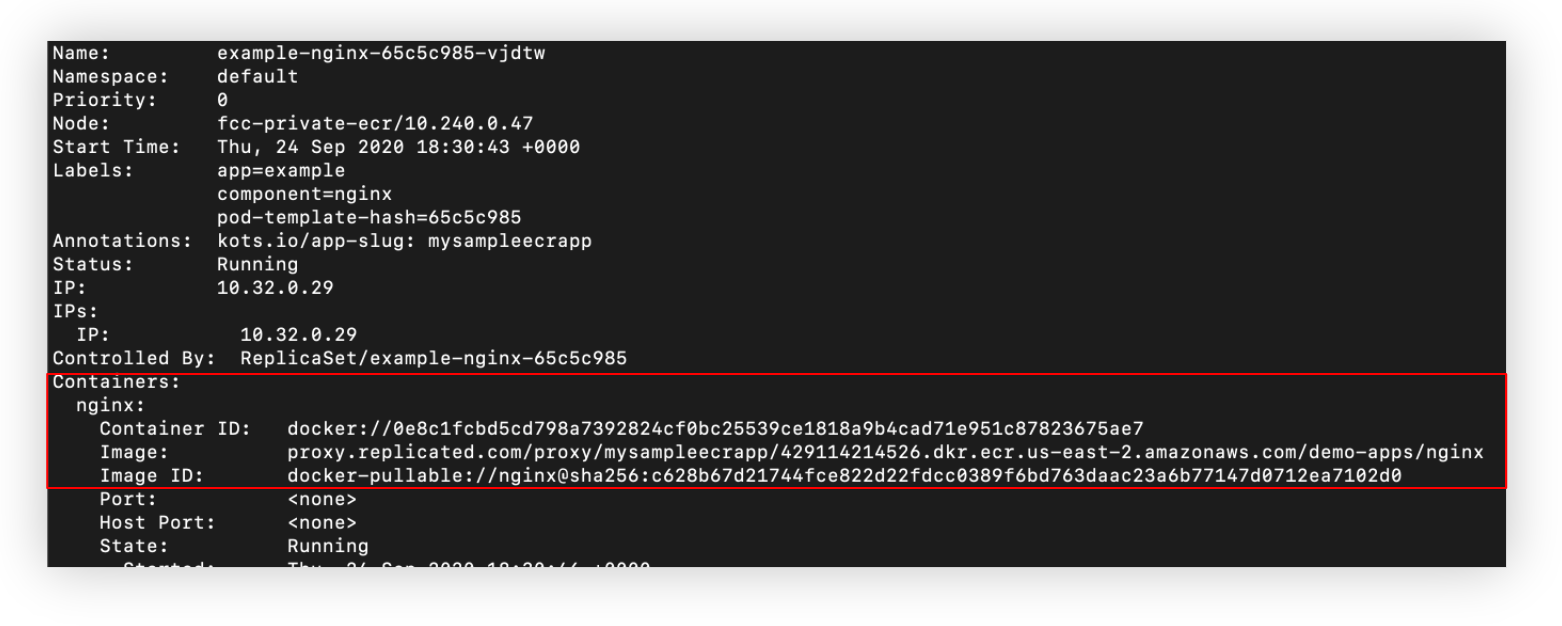
The install of the new version should have created a new pod. If we run kubectl describe pod on the new NGINX pod, we can confirm that the image was in fact pulled from the ECR repository.
